Difference between revisions of "Orange Oasis"
m (→Train Station) |
|||
| (25 intermediate revisions by 3 users not shown) | |||
| Line 1: | Line 1: | ||
{{Spoiler}} | {{Spoiler}} | ||
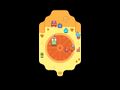
[[File:ORANGE OASIS Logo.png|thumb|right| The Orange Oasis]] | [[File:ORANGE OASIS Logo.png|thumb|right| The Orange Oasis]] | ||
{{PAGENAME}} is a [[Locations|location]] in ''[[OMORI (Game)|OMORI]]''. It's an optional area that can be accessed by using the [[Train pass|train pass]] on the [[Vast Forest#Train Station|Train Station]].<br>This area connects with the [[Vast Forest]] by the train station, the [[Rain Town]] accessed by interacting with the orange lake nearby [[Mari|Mari's]] [[Picnic]] and to [[Dino's Dig]], located in the middle of the Oasis. | {{PAGENAME}} is a [[Locations|location]] in ''[[OMORI (Game)|OMORI]]''. It's an optional area that can be accessed by using the [[Train pass|train pass]] on the [[Vast Forest#Train Station|Train Station]].<br>This area connects with the [[Vast Forest]] by the train station, the [[Rain Town]] accessed by interacting with the orange lake nearby [[Mari|Mari's]] [[Picnic]] and to [[Dino's Dig]], located in the middle of the Oasis. | ||
== Overview == | == Overview == | ||
The Orange Oasis is a desert made out of food | The Orange Oasis is a desert made out of food, the sand on the ground is brown sugar and there are trees that resemble bananas, the enemies fought here and the characters found here are also similarly themed. A point of interest is the [[Dino's Dig]].<br> | ||
Being an optional area, nothing forces the party to come here, an optional dungeon with a boss can also be found, as well as various [[Items|items]] of all kinds. | |||
Being an optional area, nothing forces the party to | |||
== Notable areas == | == Notable areas == | ||
=== Central area === | === Central area === | ||
Near the | Near the center of the Orange Oasis, Dino's Dig can be found, close to its entrance a vending stand can be found selling [[Milk]], [[Peach Soda]] and [[Orange Juice]], depending on which tile the character interacts with, on one of the tables the [[Tofu Connoisseur]] can be found exchanging [[Tofu]] for various types of [[Snacks]], the area's [[Cheers|Mailbox]] sells [[Waffle]], [[Pancake]], [[Berry Smoothie]], [[Air Horn]] and [[Life Jam]]. | ||
North east of Dino's dig, a [[Treasure Map]] can be found that details the location of the [[Hangman|Blackletter]] 'X'. Near the map are a [[Telescope|telescope]] and a floating [[Mirror|mirror]].<br> | North east of Dino's dig, a [[Treasure Map]] can be found that details the location of the [[Hangman|Blackletter]] 'X'. Near the map are a [[Telescope|telescope]] and a floating [[Mirror|mirror]].<br> | ||
At the top of Dino's dig building, [[Scott]], a dinosaur asks you to scratch his back. This initiates the "[[Itchy]]" quest.<br> | At the top of Dino's dig building, [[Scott]], a dinosaur asks you to scratch his back. This initiates the "[[Itchy]]" quest.<br> | ||
Near the middle of the area, Mari has set up a picnic near a lake, interacting with the sparkling tile found at the top of the lake leads to | Near the middle of the area, Mari has set up a picnic near a lake, interacting with the sparkling tile found at the top of the lake leads to Rain Town, on the elevation nearby [[Mr. Outback]] and a watermelon containing a [[Wishbone]] can be found, to reach the top of the elevation, [[Omori]] must first learn how to cut open the big mushroom's bulb in the garden at [[Sweetheart's Castle]]. If one arrives here after overcoming the fear of drowning, then Mr.Outback will be turned to sand. | ||
If one arrives here after overcoming the fear of drowning, then Mr.Outback will be turned to sand. | |||
In the upper right corner, a [[Crossant|crossant]] can be found on its back, if flipped over, he will thank Omori and walk away | In the upper right corner, a [[Crossant|crossant]] can be found on its back, if flipped over, he will thank Omori and walk away, several houses are located here as well.<br> | ||
Right below that a sandwich club door can be found, Near that is the path to the toast grave.<br> | Right below that a sandwich club door can be found, Near that is the path to the toast grave.<br> | ||
In the lower right corner is a small area with a [[Joke book|joke]], [[Large Face]] and a [[Ghost Party (quest)|hat ghost]]. | In the lower right corner is a small area with a [[Joke book|joke]], [[Large Face]] and a [[Ghost Party (quest)|hat ghost]]. | ||
Lastly, | Lastly, Peach Soda, [[Grape Soda]], 2 [[Mango Smoothie]], [[S.berry Smoothie]], [[Apple Juice]], 8 [[Banana Smoothie]], Life Jam, Orange Juice, [[Breadfruit Juice]] can be found inside the area's watermelons, however, some of these watermelons are hidden from sight, being found behind structures and trees. | ||
<gallery> | <gallery> | ||
Map Orange Oasis.png|The central area without events. | Map Orange Oasis.png|The central area without events. | ||
Location Cheese Joke.png|Location of the joke sign, Large face can also be seen here, with the beard ghost being found going to the right path. | Location Cheese Joke.png|Location of the joke sign, Large face can also be seen here, with the beard ghost being found going to the right path. | ||
SS Location Treasure map.png|The treasure map, with the mirror being visible nearby. | SS Location Treasure map.png|The treasure map, with the mirror being visible nearby. | ||
SS Location Outback.png|Location of Mr. Outback, the mailbox and the Tofu Connoisseur can also be found here. | SS Location Outback.png|Location of Mr. Outback, the mailbox, and the Tofu Connoisseur can also be found here. | ||
SS Wishbone.jpg|Location of the wishbone. | SS Wishbone.jpg|Location of the wishbone. | ||
Location Oasis VIP Room.png|Location of the area's VIP room. | Location Oasis VIP Room.png|Location of the area's VIP room. | ||
SS_OO_watermelon0.png|Location of the watermelon hidden by the portal. | SS_OO_watermelon0.png|Location of the watermelon hidden by the portal. | ||
SS_OO_watermelon1.png|A watermelon behind the toppings of the mountain. | SS_OO_watermelon1.png|A watermelon behind the toppings of the mountain. | ||
SS_OO_watermelon3.png|Location of the watermelon behind [[Pluto's spaceline]]. | SS_OO_watermelon3.png|Location of the watermelon behind [[Pluto's spaceline]], [[Abbi|Abbi's]] tentacle pond is also visible. | ||
SS_OO_watermelon2.png|One of the various watermelons hidden behind the palm tree, notice that the watermelon's top is slightly visible. | SS_OO_watermelon2.png|One of the various watermelons hidden behind the palm tree, notice that the watermelon's top is slightly visible. | ||
</gallery> | </gallery> | ||
| Line 46: | Line 41: | ||
A small cave with [[Rell & Victor|Rell]], [[Mina]] and their 6 children Victor (which is on Rell's arms), [[Nova]], [[Luke]], [[Adonus]], [[Jojo]], and [[Nathan]]. | A small cave with [[Rell & Victor|Rell]], [[Mina]] and their 6 children Victor (which is on Rell's arms), [[Nova]], [[Luke]], [[Adonus]], [[Jojo]], and [[Nathan]]. | ||
===== Arrow Cave ===== | ===== Arrow Cave ===== | ||
The arrow cave main entrance can be found on the small whirlwind nearby the houses, it consists of a small maze with various enemies that only spawn if the party takes the incorrect way, at the very end a small board | The arrow cave main entrance can be found on the small whirlwind nearby the houses, it consists of a small maze with various enemies that only spawn if the party takes the incorrect way, at the very end, there is a small board with "you did it" written on it, as well as the stairs leading back to the central area. | ||
<gallery> | <gallery> | ||
Map OO Palmie.png|The interior of Palmie's sandwich-shaped house. | Map OO Palmie.png|The interior of Palmie's sandwich-shaped house. | ||
| Line 62: | Line 57: | ||
=== Orange Joe's cliff === | === Orange Joe's cliff === | ||
A small cliff north of the central area with a small orange-like house in the middle, [[Orange Joe (character)|Orange Joe]] can be found here throwing oranges on the cliff, the quest "[[The Conviction of Orange Joe]]" can be acquired with him, after finishing the quest, [[Oragne Joe]] will also be found here, "commemorating" with Orange Joe. <br>Interacting with the pool nearby rewards with an Orange Juice once. Lastly, various Oranges can be found in the ground with the following message: | |||
:"''To my dear brother Oragne Joe. I hope this message finds its way to you. Please come home.''". | |||
==== Orange Joe's house ==== | ==== Orange Joe's house ==== | ||
Orange joe's home, a normal circular house, like the outside various oranges can be found scattered on the ground, as well as a watermelon containing a [[Blood Orange]], however, after completing the quest mentioned above, the house will change its layout, causing the watermelon to disappear. | |||
=== Toast | <gallery> | ||
Map OO Orange cliff.png|Orange Joe's cliff. | |||
SS Orange Joe's house.jpg|Orange Joe's house before the quest. | |||
SS_Orange Joe house quest.png|Orange Joe's house after completing his quest. | |||
</gallery> | |||
=== Toast Grave === | |||
To the east of the central area, a short path can be found with various toasts sticking out of the ground, the [[Man on Fire]] can be found running wildly back and forth the path, stopping him either by blocking his way or by trying to talk to him when he's in front of the party will cause him to talk, agreeing with him rewards [[Hero]] with the skill "spicy food". Following the path leads to the Toast Grave itself. | |||
<br>The toast grave is a small "graveyard" with two lines of toasts, interacting with the last four toast in from right to left, as seen in the [[Ancient Code]], opens the way to the doom entrance, the now unattached bread can be interacted with, rewarding it with a [[Bread]], after completing the small dungeon, the party will spawn back in the graves accompanied by a watermelon containing the [[Breadphones]]. | |||
<gallery> | |||
SS MoF blocked.png|The man on fire being blocked by the party. | |||
SS Breadphones.jpg|The party after returning to the graveyard, the breadphones and portal leading back to the summoning circle can also be seen, as well as the bread that can be picked up. | |||
</gallery> | |||
=== Inside the toast grave === | === Inside the toast grave === | ||
The first map found once entering the grave for the first time is the doom entrance, a small pool, blocking the way of the party if they arrive there before [[Sunny]] overcomes his fear of drowning, stands between the entrance and a corridor leading to a giant bread, interacting with it causes it to crash in the ground, making the friends fall for the next area. | |||
==== Summoning Circle ==== | |||
The party will arrive on the second area, the summoning circle, by falling on a pile of flour, which will cover everyone in flour, changing the sprites. Moving further the party will see a big room guarded by an [[Actual Mole]], which will lead the party back to the graveyard, various offerings that can be sacrificed in the middle of the circle, causing a variety of effects: | |||
*Sacrificing the loaf of bread triggers a battle with [[Slice]], [[Sesame]] & [[Sourdough]]. | |||
*Sacrificing the spaghetti triggers a battle with some [[Copypasta|Copypastas]]. | |||
*Sacrificing the life jam triggers a battle with some [[Living Bread]]. | |||
*Sacrificing the cookie plate will reveal [[Papa Chip]], despite having a reward sound play, it does not add anything to the party inventory. | |||
*Sacrificing the oatmeal cookies triggers a small cutscene followed by a battle with the [[Nefarious Chip]]. | |||
*Sacrificing the bunny triggers a battle with a [[Cupcake Bunny]]. | |||
*Sacrificing the stray cat will cause music to halt and the room to become darker, summoning various [[Hushpuppy|Hushpuppies]] that will slowly follow the party. | |||
When the party takes one of the offerings, a number will be visible on the table, forming the code "7201969", the code can be used on the safe nearby, revealing a [[Recipe 4 Disaster]], once in possession of this item, the party will be able to pick up the Mole and sacrificing it on the circle, allowing the party to also enter the circle and progress further into the area, the circle can only be used this way once, and if the party ever comes here again, the only way out will be the ghost of the Actual Mole. | |||
<br> | |||
The friends will be sent to a corridor leading down, following the path for a bit will trigger a giant boulder to follow the party, running away will cause the party to fall into a pit, which will cause a fake "you died" screen to show up and will eventually lead the group to the next area, letting the boulder reach them also causes the same outcome. | |||
==== Baking Room & Pantry ==== | |||
After the fake you died screen, the party will be toasted with Omori waking up in the middle of a pantry, 3 watermelons containing Life Jam can be found around the room and can be used to revive the 3 friends. | |||
Moving out of the pantry leads to the baking room, where a picnic, which can only be accessed the first time the party arrives here, as the room becomes inaccessible afterward, two other pantries with watermelons containing Bread, Waffle and [[Donut]] and a corridor leading to the bakery where [[Biscuit]] & [[Doughie]] can be found, approaching them triggers a cutscene which ends in a boss battle with the [[Unbread Twins]], winning this fight's optional and after it the brothers will leave through the portal, taking the portal will lead back to the toast graveyard. | |||
<gallery> | |||
SS big bread.png|The giant bread. | |||
SS_flour_party.png|Everyone covered in flour. | |||
SS summon circle.png|The summoning circle map with all the offerings present, including the Actual Mole. | |||
File:SS Recipe safe location.png|The summoning circle with no offering present. | |||
Fake you died.png|the fake "you died" screen. | |||
SS_Pantry1.png|The pantry where the party is found toasted. | |||
SS_Pantry2.png|The second pantry. | |||
SS_Pantry3.png|The third pantry. | |||
</gallery> | |||
== Characters == | == Characters == | ||
<gallery widths="90" captionalign="center" bordersize="medium" navigation="true" hideaddbutton=true> | <gallery widths="90" captionalign="center" bordersize="medium" navigation="true" hideaddbutton=true> | ||
Mole sprite.png|[[Actual Mole]] | Mole sprite.png|[[Actual Mole]] | ||
| Line 82: | Line 114: | ||
Cowblin sprite.png|[[Cowblin]] | Cowblin sprite.png|[[Cowblin]] | ||
Crossant sprite.png|[[Crossant]] | Crossant sprite.png|[[Crossant]] | ||
Child stilts | Child stilts sprite.png|[[Child on Stilts]] | ||
Donut grandma sprite.png|[[Donut grandma]] | Donut grandma sprite.png|[[Donut grandma]] | ||
Doughie sprite.png|[[Doughie]] | |||
Gator Guy sprite.png|[[Gator Guy]] | |||
Guava sprite.png|[[Guava]] | |||
Jelly sprite.png|[[Jelly]] | |||
Lamb sprite.png|[[Lamb]] | |||
Large Face sprite.png|[[Large Face]] | Large Face sprite.png|[[Large Face]] | ||
Luke sprite.png|[[Luke]] | Luke sprite.png|[[Luke]] | ||
Mailbox.png|[[Cheers]] | Mailbox.png|[[Cheers]] | ||
MARI SPRITE.png|[[Mari]] | MARI SPRITE.png|[[Mari]] | ||
| Line 103: | Line 137: | ||
Oragne Joe sprite.png|[[Oragne Joe]] | Oragne Joe sprite.png|[[Oragne Joe]] | ||
Owangee sprite.png|[[Owangee]] | Owangee sprite.png|[[Owangee]] | ||
Palmie sprite.png|[[Palmie]] | |||
Papa Chip sprite.png|[[Papa Chip]] | |||
Peanut sprite.png|[[Peanut]] | |||
Pellet sprite.png|[[Pellet]] | |||
Pirate sprite.png|[[Space pirates]] | |||
Rell & Victor sprite.png|[[Rell & Victor]] | Rell & Victor sprite.png|[[Rell & Victor]] | ||
Ricoli Ravioli sprite.png|[[Ricoli Ravioli]] | Ricoli Ravioli sprite.png|[[Ricoli Ravioli]] | ||
| Line 108: | Line 147: | ||
Sereno sprite.png|[[Sereno]] | Sereno sprite.png|[[Sereno]] | ||
Square sprite.png|[[Square]] | Square sprite.png|[[Square]] | ||
Spot sprite.png|[[Spot]] | Spot sprite.png|[[Spot]] | ||
Sydney sprite.png|[[Sydney]] | Sydney sprite.png|[[Sydney]] | ||
| Line 119: | Line 153: | ||
Whizzy Whitney sprite.png|[[Whizzy Whitney]] | Whizzy Whitney sprite.png|[[Whizzy Whitney]] | ||
Wily sprite.png|[[Wily]] | Wily sprite.png|[[Wily]] | ||
Wolf sprite.png|[[Wolf]] | |||
</gallery> | </gallery> | ||
| Line 138: | Line 173: | ||
</gallery> | </gallery> | ||
== Trivia == | == Trivia == | ||
*The layout of Orange Oasis is based | *The layout of Orange Oasis is based on the '''Food Pyramid''' book, which can be seen in the Hikikomori route while doing the sorting chore on One Day Left. | ||
*It's believed that Dino's Dig is based on the '''"Digging Dino's"''' coloring book. | *It's believed that Dino's Dig is based on the '''"Digging Dino's"''' coloring book. | ||
* | *After fighting the [[Hushpuppy|Hushpuppies]], the Orange Oasis battle theme will be replaced by [[Life Jam Guy|Life Jam Guy's]] theme instead of the usual Orange Oasis battle theme, this is likely an oversight left by the developers. | ||
:* Life Jam Guy's theme is internally known as "Battle Dough Dungeon" | |||
*On the last day of the Hikikomori [[Routes|route]], there is a poster on the [[Vast_Forest#Forest_Playground|Playground]] that advertises Dino's Dig. | *On the last day of the Hikikomori [[Routes|route]], there is a poster on the [[Vast_Forest#Forest_Playground|Playground]] that advertises Dino's Dig. | ||
*The pamphlet about Last Resort found in the train station reads: | |||
:"'Come down to the Last Resort, grand opening in scenic [[Deep Well]]! Enjoy this luxury getaway, located just a few miles away from the city.'" | |||
:"'Bask in the finest amenities the world has to offer at our private retreat and leave truly transformed!'" | |||
*If the game is under heavy lag when loading the map, it's possible that the Man on Fire fails to calculate his trajectory, causing him to remain still at the spawn point. | |||
*Much like the pond in [[Otherworld]] and on the [[North Lake|North Lake's]] coast, standing too long nearby the water before overcoming the fear will cause the music to slowly fade and "tentacles" to slowly approach the party, staying too long will cause the [[Something in the Water]] battle music to play. | |||
*Considering the comment found in one of the events of the summoning circle map, it seems it was intended for the party to land on one of the pantries by random, but it seems it was scrapped to instead fall on a specific one. | |||
:*''Player starts high up, camera focuses on randomized pantry that you fall into''. | |||
*Despite not having his dialogue suggesting this, the Actual Mole will take one Life Jam from the player's inventory when leading the party back up '''after being sacrificed''', it's not required to have one, but he will take it. | |||
*If the player summons Papa Chip before Nefarious Chip, he will try convincing the party to not summon him: | |||
:*Papa Chip: ''Papa Chip sees you eyeing that plate of oatmeal cookies. Papa Chips warns you now for your own sake... Don't do it!''.<br>Papa Chip: ''Now listen here... Papa Chip has saved a great deal of explorers by warning them of the plethora of dangers in these tombs''.<br>Papa Chip: ''You'd best listen to Papa Chip's advice''.<br>Papa Chip: ''Step... away... from the oatmeal cookies.''.<br>Papa Chip: ''Please travelers... Papa Chip is begging you! Don't do it! Do not waste your precious young lives on something so fruitless!''.<br>You took the oatmeal cookies despite Papa Chip's warnings.<br>Papa Chip: ''Oh! You've done it now! Oh doughie, you've done it now! Papa Chip can't look!''. | |||
*A life jam is given to the player when picking up the life jam for sacrifice, returning it to the table also takes away a life jam, however, sacrificing the life jam on the summoning portal does not remove the life jam from the inventory, this is likely an oversight. | |||
* The dough dungeon was originally supposed to be in [[Pyrefly Forest]] according to [https://cdn.discordapp.com/attachments/792948324101259284/1005571347780468756/unknown.png old concept art],[https://cdn.discordapp.com/attachments/792948324101259284/1005573030291972176/unknown.png old developer comments] and the fact that that area's enemies are grouped with the Pyrefly Forest's enemies. | |||
* The code used in the summoning circle section could refer to both the first moon landing on the 20th of July 1969 and [[Sunny|Sunny's]] birthday. | |||
* Dino's Dig was [https://cdn.discordapp.com/attachments/792948324101259284/1005571347780468756/unknown.png originally supposed to only have three layers]. A fourth layer was added shortly after the first three had been made. | |||
== References == | == References == | ||
Latest revision as of 20:32, 5 November 2023
 | WARNING: This article contains spoilers for the main story of OMORI. |
Orange Oasis is a location in OMORI. It's an optional area that can be accessed by using the train pass on the Train Station.
This area connects with the Vast Forest by the train station, the Rain Town accessed by interacting with the orange lake nearby Mari's Picnic and to Dino's Dig, located in the middle of the Oasis.
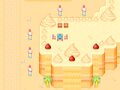
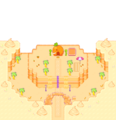
Overview
The Orange Oasis is a desert made out of food, the sand on the ground is brown sugar and there are trees that resemble bananas, the enemies fought here and the characters found here are also similarly themed. A point of interest is the Dino's Dig.
Being an optional area, nothing forces the party to come here, an optional dungeon with a boss can also be found, as well as various items of all kinds.
Notable areas
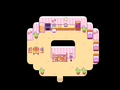
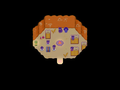
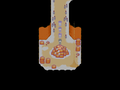
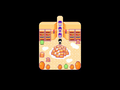
Central area
Near the center of the Orange Oasis, Dino's Dig can be found, close to its entrance a vending stand can be found selling Milk, Peach Soda and Orange Juice, depending on which tile the character interacts with, on one of the tables the Tofu Connoisseur can be found exchanging Tofu for various types of Snacks, the area's Mailbox sells Waffle, Pancake, Berry Smoothie, Air Horn and Life Jam.
North east of Dino's dig, a Treasure Map can be found that details the location of the Blackletter 'X'. Near the map are a telescope and a floating mirror.
At the top of Dino's dig building, Scott, a dinosaur asks you to scratch his back. This initiates the "Itchy" quest.
Near the middle of the area, Mari has set up a picnic near a lake, interacting with the sparkling tile found at the top of the lake leads to Rain Town, on the elevation nearby Mr. Outback and a watermelon containing a Wishbone can be found, to reach the top of the elevation, Omori must first learn how to cut open the big mushroom's bulb in the garden at Sweetheart's Castle. If one arrives here after overcoming the fear of drowning, then Mr.Outback will be turned to sand.
In the upper right corner, a crossant can be found on its back, if flipped over, he will thank Omori and walk away, several houses are located here as well.
Right below that a sandwich club door can be found, Near that is the path to the toast grave.
In the lower right corner is a small area with a joke, Large Face and a hat ghost.
Lastly, Peach Soda, Grape Soda, 2 Mango Smoothie, S.berry Smoothie, Apple Juice, 8 Banana Smoothie, Life Jam, Orange Juice, Breadfruit Juice can be found inside the area's watermelons, however, some of these watermelons are hidden from sight, being found behind structures and trees.
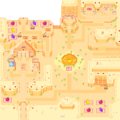
The central area without events.
Location of the joke sign, Large face can also be seen here, with the beard ghost being found going to the right path.
The treasure map, with the mirror being visible nearby.
Location of Mr. Outback, the mailbox, and the Tofu Connoisseur can also be found here.
Location of the wishbone.
Location of the area's VIP room.
Location of the watermelon hidden by the portal.
A watermelon behind the toppings of the mountain.
Location of the watermelon behind Pluto's spaceline, Abbi's tentacle pond is also visible.
One of the various watermelons hidden behind the palm tree, notice that the watermelon's top is slightly visible.


Oasis interiors & alcoves
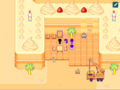
Palmie's house
Palmie's home, where Jelly can be found with the quest "Present for Palmie", Palmie herself and Peanut roaming around.
Grandma's house
A house with three Donut Grandmas, interacting with the bookshelf on the house brings up a photo similar to Pessi's Thing.
Rell and Mina house
A small cave with Rell, Mina and their 6 children Victor (which is on Rell's arms), Nova, Luke, Adonus, Jojo, and Nathan.
Arrow Cave
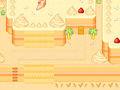
The arrow cave main entrance can be found on the small whirlwind nearby the houses, it consists of a small maze with various enemies that only spawn if the party takes the incorrect way, at the very end, there is a small board with "you did it" written on it, as well as the stairs leading back to the central area.
The interior of Palmie's sandwich-shaped house.
The interior of the grandmas' donut-shaped house.
Rell and Mina's cave.

An eventless overview of the Arrow cave.
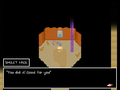
The end of the Arrow Cave.
The entrance and exit of the Arrow cave, the exit will only become visible after completing it once.


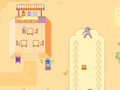
Train Station
For information regarding the train, go to Vast Forest.
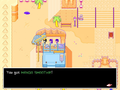
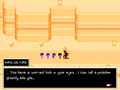
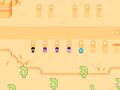
The Orange Oasis' small train station, going into the train leads back to Vast Forest, various NPCs can be found here, most of them could also be found during the first day on the line to take the Vast Forest's train, some Gator guys can also be found here nearby the pamphlets about Last Resort, but will disappear after the second night.
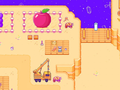
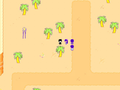
Orange Joe's cliff
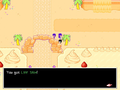
A small cliff north of the central area with a small orange-like house in the middle, Orange Joe can be found here throwing oranges on the cliff, the quest "The Conviction of Orange Joe" can be acquired with him, after finishing the quest, Oragne Joe will also be found here, "commemorating" with Orange Joe.
Interacting with the pool nearby rewards with an Orange Juice once. Lastly, various Oranges can be found in the ground with the following message:
- "To my dear brother Oragne Joe. I hope this message finds its way to you. Please come home.".
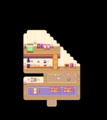
Orange Joe's house
Orange joe's home, a normal circular house, like the outside various oranges can be found scattered on the ground, as well as a watermelon containing a Blood Orange, however, after completing the quest mentioned above, the house will change its layout, causing the watermelon to disappear.
Orange Joe's cliff.
Orange Joe's house before the quest.

Orange Joe's house after completing his quest.


Toast Grave
To the east of the central area, a short path can be found with various toasts sticking out of the ground, the Man on Fire can be found running wildly back and forth the path, stopping him either by blocking his way or by trying to talk to him when he's in front of the party will cause him to talk, agreeing with him rewards Hero with the skill "spicy food". Following the path leads to the Toast Grave itself.
The toast grave is a small "graveyard" with two lines of toasts, interacting with the last four toast in from right to left, as seen in the Ancient Code, opens the way to the doom entrance, the now unattached bread can be interacted with, rewarding it with a Bread, after completing the small dungeon, the party will spawn back in the graves accompanied by a watermelon containing the Breadphones.
The man on fire being blocked by the party.
The party after returning to the graveyard, the breadphones and portal leading back to the summoning circle can also be seen, as well as the bread that can be picked up.


Inside the toast grave
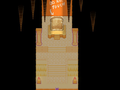
The first map found once entering the grave for the first time is the doom entrance, a small pool, blocking the way of the party if they arrive there before Sunny overcomes his fear of drowning, stands between the entrance and a corridor leading to a giant bread, interacting with it causes it to crash in the ground, making the friends fall for the next area.
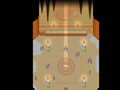
Summoning Circle
The party will arrive on the second area, the summoning circle, by falling on a pile of flour, which will cover everyone in flour, changing the sprites. Moving further the party will see a big room guarded by an Actual Mole, which will lead the party back to the graveyard, various offerings that can be sacrificed in the middle of the circle, causing a variety of effects:
- Sacrificing the loaf of bread triggers a battle with Slice, Sesame & Sourdough.
- Sacrificing the spaghetti triggers a battle with some Copypastas.
- Sacrificing the life jam triggers a battle with some Living Bread.
- Sacrificing the cookie plate will reveal Papa Chip, despite having a reward sound play, it does not add anything to the party inventory.
- Sacrificing the oatmeal cookies triggers a small cutscene followed by a battle with the Nefarious Chip.
- Sacrificing the bunny triggers a battle with a Cupcake Bunny.
- Sacrificing the stray cat will cause music to halt and the room to become darker, summoning various Hushpuppies that will slowly follow the party.
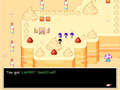
When the party takes one of the offerings, a number will be visible on the table, forming the code "7201969", the code can be used on the safe nearby, revealing a Recipe 4 Disaster, once in possession of this item, the party will be able to pick up the Mole and sacrificing it on the circle, allowing the party to also enter the circle and progress further into the area, the circle can only be used this way once, and if the party ever comes here again, the only way out will be the ghost of the Actual Mole.
The friends will be sent to a corridor leading down, following the path for a bit will trigger a giant boulder to follow the party, running away will cause the party to fall into a pit, which will cause a fake "you died" screen to show up and will eventually lead the group to the next area, letting the boulder reach them also causes the same outcome.
Baking Room & Pantry
After the fake you died screen, the party will be toasted with Omori waking up in the middle of a pantry, 3 watermelons containing Life Jam can be found around the room and can be used to revive the 3 friends.
Moving out of the pantry leads to the baking room, where a picnic, which can only be accessed the first time the party arrives here, as the room becomes inaccessible afterward, two other pantries with watermelons containing Bread, Waffle and Donut and a corridor leading to the bakery where Biscuit & Doughie can be found, approaching them triggers a cutscene which ends in a boss battle with the Unbread Twins, winning this fight's optional and after it the brothers will leave through the portal, taking the portal will lead back to the toast graveyard.
The giant bread.
Everyone covered in flour.

The summoning circle map with all the offerings present, including the Actual Mole.
The summoning circle with no offering present.

the fake "you died" screen.
The pantry where the party is found toasted.
The second pantry.
The third pantry.


Characters
- Mole sprite.png
- Blookie sprite.png
- Canopy sprite.png
- Cowblin sprite.png
- Crossant sprite.png
- Donut grandma sprite.png
- Guava sprite.png
- Jelly sprite.png
- Lamb sprite.png
- Large Face sprite.png
- Luke sprite.png
- Mimi sprite.png
- Mina sprite.png
- Mooncake sprite.png
- Nathan sprite.png
- Nefarious Chip sprite.png
- Nova sprite.png
- Outback sprite.png
- Owangee sprite.png
- Palmie sprite.png
- Peanut sprite.png
- Pellet sprite.png
- Rell & Victor sprite.png
- Ricoli Ravioli sprite.png
- Scott head sprite.png
- Sereno sprite.png
- Square sprite.png
- Spot sprite.png
- Sydney sprite.png
- Wee Cactus sprite.png
- Whizzy Whitney sprite.png
- Wily sprite.png
- Wolf sprite.png


Enemies
.gif)
.gif)
.gif)
.gif)
.gif)
.png)
.gif)
.gif)
.gif)
.gif)
.gif)
.gif)
.gif)
Trivia
- The layout of Orange Oasis is based on the Food Pyramid book, which can be seen in the Hikikomori route while doing the sorting chore on One Day Left.
- It's believed that Dino's Dig is based on the "Digging Dino's" coloring book.
- After fighting the Hushpuppies, the Orange Oasis battle theme will be replaced by Life Jam Guy's theme instead of the usual Orange Oasis battle theme, this is likely an oversight left by the developers.
- Life Jam Guy's theme is internally known as "Battle Dough Dungeon"
- On the last day of the Hikikomori route, there is a poster on the Playground that advertises Dino's Dig.
- The pamphlet about Last Resort found in the train station reads:
- "'Come down to the Last Resort, grand opening in scenic Deep Well! Enjoy this luxury getaway, located just a few miles away from the city.'"
- "'Bask in the finest amenities the world has to offer at our private retreat and leave truly transformed!'"
- If the game is under heavy lag when loading the map, it's possible that the Man on Fire fails to calculate his trajectory, causing him to remain still at the spawn point.
- Much like the pond in Otherworld and on the North Lake's coast, standing too long nearby the water before overcoming the fear will cause the music to slowly fade and "tentacles" to slowly approach the party, staying too long will cause the Something in the Water battle music to play.
- Considering the comment found in one of the events of the summoning circle map, it seems it was intended for the party to land on one of the pantries by random, but it seems it was scrapped to instead fall on a specific one.
- Player starts high up, camera focuses on randomized pantry that you fall into.
- Despite not having his dialogue suggesting this, the Actual Mole will take one Life Jam from the player's inventory when leading the party back up after being sacrificed, it's not required to have one, but he will take it.
- If the player summons Papa Chip before Nefarious Chip, he will try convincing the party to not summon him:
- Papa Chip: Papa Chip sees you eyeing that plate of oatmeal cookies. Papa Chips warns you now for your own sake... Don't do it!.
Papa Chip: Now listen here... Papa Chip has saved a great deal of explorers by warning them of the plethora of dangers in these tombs.
Papa Chip: You'd best listen to Papa Chip's advice.
Papa Chip: Step... away... from the oatmeal cookies..
Papa Chip: Please travelers... Papa Chip is begging you! Don't do it! Do not waste your precious young lives on something so fruitless!.
You took the oatmeal cookies despite Papa Chip's warnings.
Papa Chip: Oh! You've done it now! Oh doughie, you've done it now! Papa Chip can't look!.
- Papa Chip: Papa Chip sees you eyeing that plate of oatmeal cookies. Papa Chips warns you now for your own sake... Don't do it!.
- A life jam is given to the player when picking up the life jam for sacrifice, returning it to the table also takes away a life jam, however, sacrificing the life jam on the summoning portal does not remove the life jam from the inventory, this is likely an oversight.
- The dough dungeon was originally supposed to be in Pyrefly Forest according to old concept art,old developer comments and the fact that that area's enemies are grouped with the Pyrefly Forest's enemies.
- The code used in the summoning circle section could refer to both the first moon landing on the 20th of July 1969 and Sunny's birthday.
- Dino's Dig was originally supposed to only have three layers. A fourth layer was added shortly after the first three had been made.